How to Fix iPhone Saying No SIM: 5 Useful Ways
When you find no SIM available on iPhone, just use 5 ways below to easily solve the problem. And the professional FoneTool will help you fix it efficiently!
My iPhone says no SIM card.
Hi. My phone says no SIM card. I cannot send nor retrieve phone calls nor messages. How do I rectify this?
- Question from Apple Community
When you need to make calls or send messages, having a SIM card in your iPhone is essential. However, sometimes you might receive a notification saying "No SIM Card Installed." This can be quite frustrating, but don't worry—this article will guide you on how to quickly solve this issue.
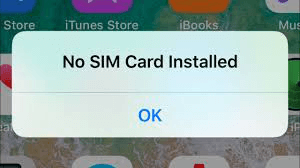
Why is my iPhone saying I have no SIM when I do?
When you encounter a “No SIM” alert or a similar notification on your iPhone, it indicates an issue with your SIM (Subscriber Identity Module) card. The SIM is a small plastic chip that fits into your device, storing essential data and enabling you to make calls and access mobile internet, among other functions.
If your iPhone displays “No SIM,” the problem could be due to a damaged or dirty SIM card, software glitches, or the need to update your carrier settings.
How to fix iPhone saying No SIM
Here we offer some useful ways to help you. Hope you can fix the issue right now!
Solution 1. Restart the iPhone
When the issue occurs, you can try to restart your device first.
For iPhone X or later: Press and hold either volume button and the side button simultaneously until the power-off slider appears > Drag the power-off slider to the right to turn off your device.

For iPhone 6/7/8 or SE(2nd or 3rd generation): Press and hold the side button until the power-off slider appears on the screen > Drag the slider to the right to power off your iPhone.
For iPhone SE (1st generation), 5, or earlier: Press and hold the top button > When the power-off slider appears, drag the slider to turn off the device.
After that, press and hold the side/top button until you see the Apple logo to turn on your iPhone. Then you can check your SIM to see if the problem is solved.
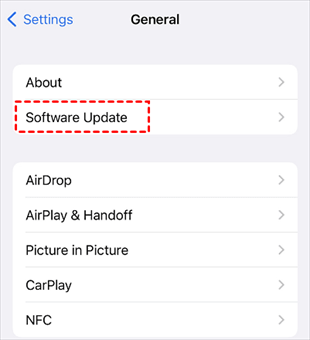
Solution 2. Update software
If your iOS system is outdated, your iPhone can always cause various iPhone issues, so you can update the software on iPhone to try to fix it. Just go to Settings > General > Choose Software Update. If there is any update available, click Download and Install to make it.
Solution 3. Check the SIM card and tray
If your iPhone is updated, take a moment to examine the SIM card and the card slot for any dirt or damage. Ensure that the SIM is properly aligned when you place it back in the tray.
Step 1. If the SIM card is dirty, carefully clean it by wiping it with a microfiber cloth or a cotton swab moistened with a 50/50 mixture of water and alcohol. Allow it to dry completely before reinserting it into the tray.
Step 2. If the SIM card is not correctly seated, follow the steps to remove and reinsert it properly.
Step 3. If your SIM card is damaged, reach out to your carrier for a replacement.
Step 4. If the tray is damaged, you will need to have your iPhone repaired.
Once the process is finished, you can check for the carrier settings: Go to Settings > General > About. If there’s an available update, follow the prompts to proceed with the update.
Solution 4. Contact your carrier
If your issue is still unresolved, please contact your wireless carrier to confirm that you have an active plan. Additionally, if your device uses an eSIM instead of a physical SIM card, you will need to reach out to your carrier to address any error messages.
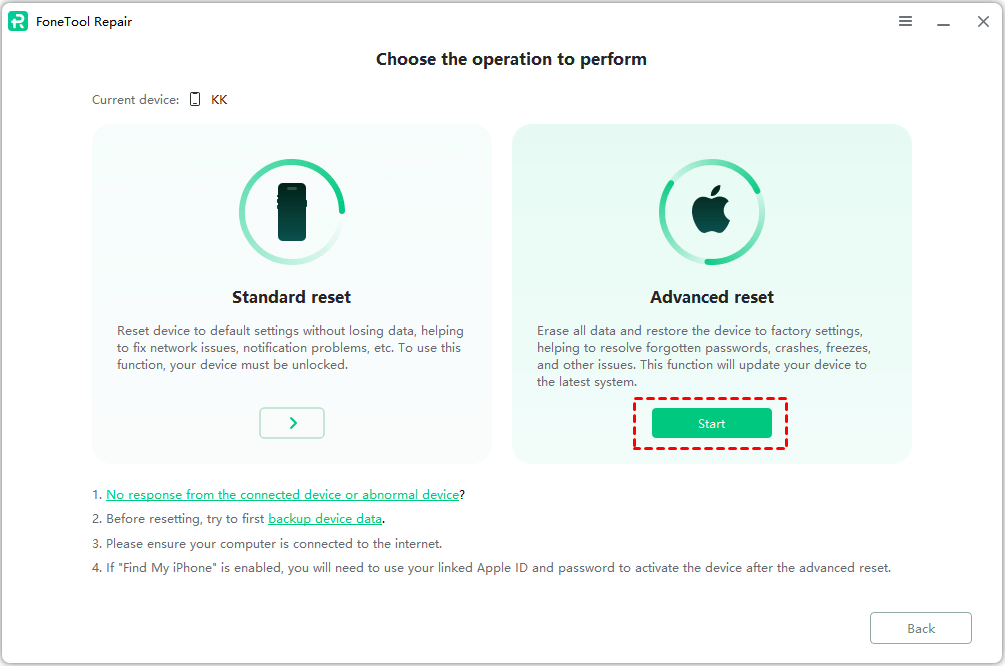
Solution 5. Factory reset your iPhone
If all ways can't work, as a last resort, you can reset your iPhone to factory settings. Note that this will erase all data on your device, so make sure to backup any important information on iPhone first.
You can perform a factory reset through your iPhone's settings: Go to Settings > General > Transfer or Reset iPhone > Erase All Content and Settings.
If you're concerned about potential iOS system issues that might prevent a successful reset, or if you want to ensure a deeper clean for selling or donating your device, FoneTool Repair provides a thorough factory reset function that can help.
Beyond Basic Fixes: When "No SIM" Indicates iOS System Issues
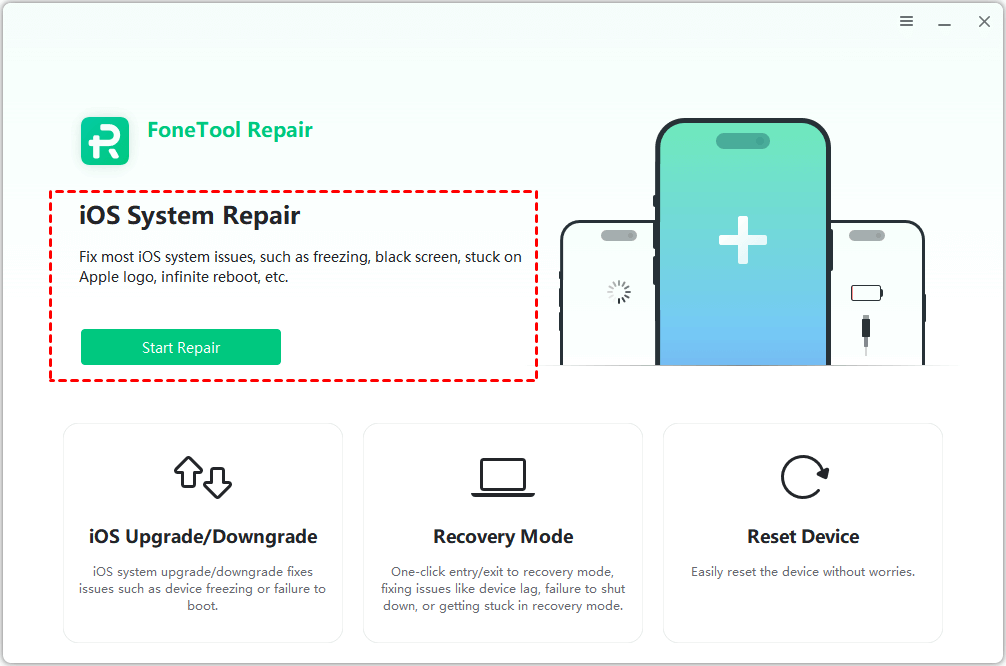
Sometimes, persistent "No SIM" errors can be symptomatic of deeper iOS system problems. If you've tried all the basic troubleshooting steps without success, your device might be experiencing system corruption or software conflicts that require more advanced repair.
This is where FoneTool Repair proves invaluable—it's specifically designed to address such complex iOS system issues without compromising your data.
This powerful iOS system repair tool is the best way to fix iOS/iPadOS issues without data loss
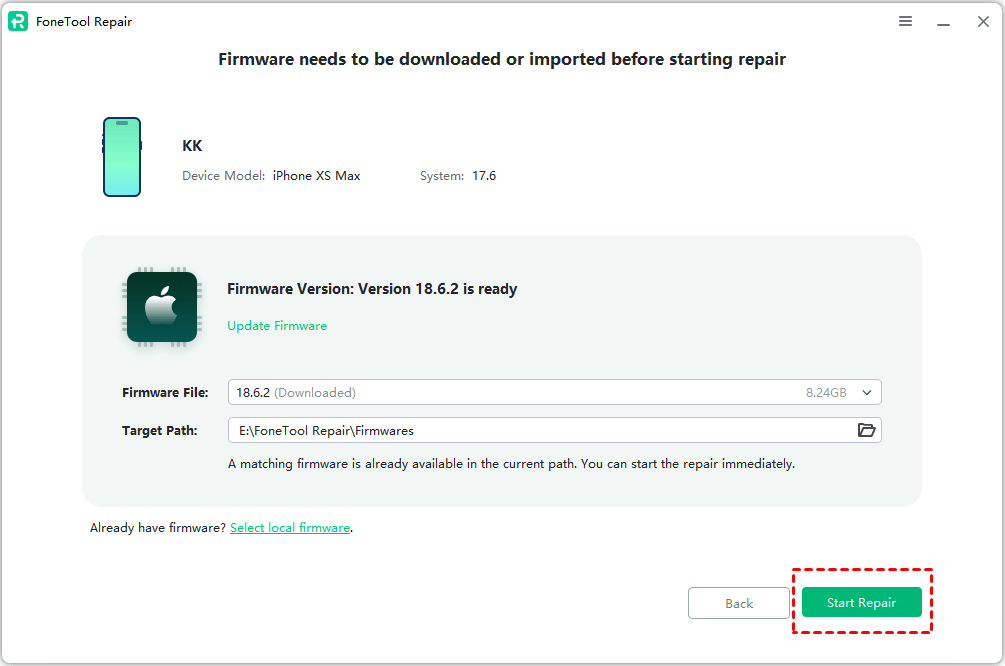
Step 1. Download and install FoneTool Repair on your Windows PC > Choose iOS System Repair to continue.
Step 2. Choose between Standard Mode (keeps your data) or Deep Mode (for more serious issues).

Step 3. Follow on-screen instructions to download necessary firmware.

Step 4. Once the download process is finished, just click Start Repair to begin the task.
Conclusion
When you encounter the no SIM available on iPhone issue, just use the 5 ways above to solve the problem. For persistent issues related to iOS system errors, FoneTool Repair provides a professional solution to fix various iOS system problems including stubborn "No SIM" errors. With its user-friendly interface and powerful repair capabilities, it can help you get your iPhone back to normal operation quickly and safely.
Remember that most SIM card issues can be resolved with simple troubleshooting, but when you suspect deeper system problems, FoneTool Repair offers a comprehensive solution that goes beyond basic fixes.
Fixes 160+ iOS/iPadOS issues, boot loops, crashes, failed updates, with no data loss.
-
 iOS 26 Compatible
 iPhone 17 Supported
100% Secure

Kathy is an editor of FoneTool, who prefers to help more users address a series of iOS-related problems. She likes traveling and being close to nature makes her relax. She is also keen to engage in social activities and spend much free time with her friends.
Read author info >>