Are you finding ways about how to remove phone number from iMessage on iPhone/iPad/Mac? This post will give you full guide to finish the process. You can also get how to back up messages on iPhone/iPad.

iMessage is an instant messaging service that allows users to send text messages, images, videos, documents and more. If you no longer use a particular phone number or have changed your phone number, or you need to switch to a new iPhone, then you can delete the phone number from iMessage.
According to your needs, now you can follow the detailed steps to delete the number on iPhone/iPad/Mac.
To remove your phone number from iMessage on your iPhone, follow these steps:
Open Settings on your iPhone/iPad > Tap on Messages to access the Messages settings > Tap on Send & Receive and you may need to enter your Apple ID passcode to proceed > Uncheck your phone number from iMessage.
Your phone number is now removed from iMessage, and you will no longer receive iMessages sent to your phone number on this device. If you want to use iMessage again in the future, you can simply go back to these settings and select your phone number again.
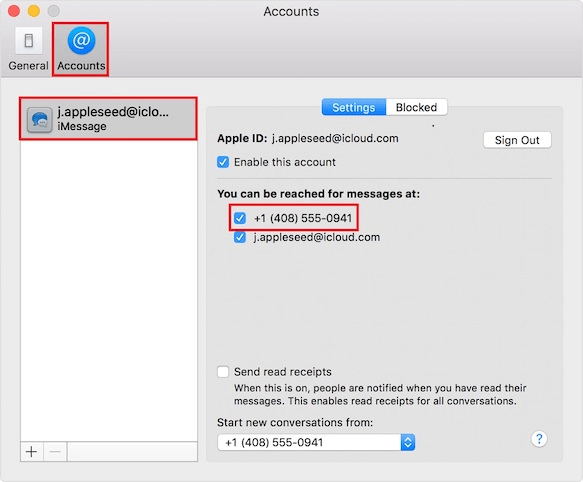
To remove your phone number from iMessage on your Mac, follow these steps:
Step 1. Launch the Messages app on your Mac > Select Preferences > Click on the Accounts tab. You will see your iMessage account listed on the left sidebar.
Step 2. Select your iMessage account and then deselect your phone number, then access and click on FaceTime > Choose Preferences > Settings to deselect the number.

Now you can remove phone number from iMessage account successfully. If you also want to learn how to delete blocked numbers on iPhone, you can check the link and follow the guide.
FoneTool is a free iPhone backup manager designed for Windows PCs. This app offers a convenient solution for backing up iPhone text messages to your computer quickly. Additionally, it simplifies the process of restoring backup content to your iPhone.
Selectively or Full Backup: It allows you to preview and selectively back up photos, videos, music, contacts and messages. And you can also fully back up iPhone like iTunes. View Backup Files Directly: You can browse your backup files directly on your PC, unlike iTunes backups which cannot be accessed. Flexible Restore: With the universe restore feature, you can easily back up iPhone to iPad/iPhone/iPod Touch. Extensive Compatibility: FoneTool supports various iPhone models, including iPhone 4 to the iPhone 14/15, as well as the latest iOS 16/17.
Now, download the FoneTool on your Windows PC to see how to back up text messages on iPhone/iPad.
Step 1. Connect the iPhone/iPad to your computer with a USB cable > Launch FoneTool.
Step 2. Click Phone Backup > Choose Selective Backup and tap on Get Started. (You can also choose Full Backup to back up all your iPhone data including iMessage data on PC.)
Step 3. Click the Messages icon to select the text messages you need to back up, then choose OK to continue.
Step 4. Click Backup Storage Path to select the storage path and tap on Start Backup to begin.
Next time if you need, you can go to Backup History, choose Restore dot to restore your text messages.
From this article, you can know how to remove phone number from iMessage on iPhone/iPad/Mac. If you need, you can also choose FoneTool to selectively back up your text messages or fully back up all your iPhone/iPad data.
Except for iPhone/iPad backup feature, FoneTool can also help you transfer and erase iPhone/iPad data efficiently. So you can delete messages from iPhone but not iCloud easily.
No, removing a phone number from iMessage won't delete your existing messages. It only prevents that number from receiving future iMessages.
Yes, you can disable iMessage for a phone number temporarily by following the steps mentioned earlier. You can re-enable it whenever you want.
If you remove someone's phone number from iMessage, they won't receive iMessages on that number. They'll need to re-enable it if they want to use iMessage again.
To confirm, go to Settings > Messages > Send & Receive. If the phone number is unchecked, it has been removed from iMessage.